2-in-1 Lasagna and Eggplant Parmigiana

eggplantlasagna24

This meal was partly born out of the beautiful eggplant that I bought from a local vegetable farm. Knowing that my children would never go near the eggplant, I had the idea to make a portion of the dish into a traditional lasagna.  It was a perfect pairing because I used the exact same filling ingredients for both sides of this combo dish.

eggplantlasagna01

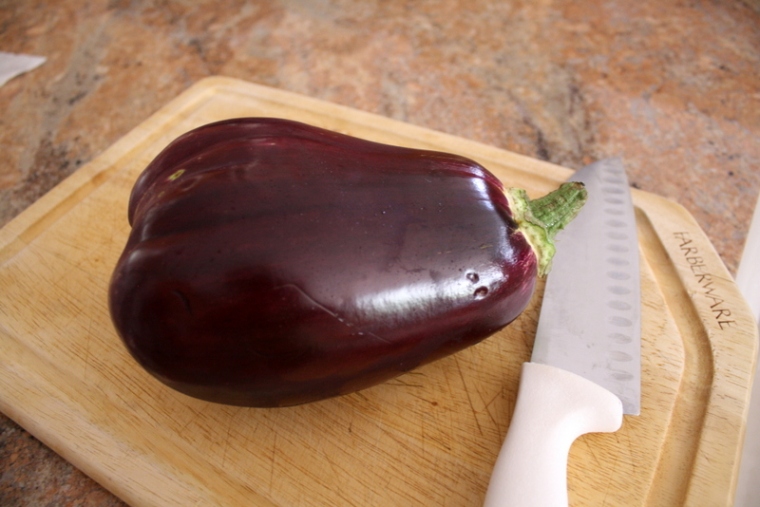
I just love the color of eggplant, don’t you?  Did you know the color and vegetable is technically called aubergine?  I just love saying that word.  Try it with me…….”oh-ber-zheen.”

eggplantlasagna02Get it all sliced up into about 1/4 inch slices.

eggplantlasagna03I then put it through a 3-step breading process.  Flour first, then egg wash and lastly, Italian breadcrumbs.

eggplantlasagna04Here is my favorite kitchen helper.  My daughter has to stand on a stool to make it all work.  Love it!

eggplantlasagna07My favorite part of the eggplant parmigiana is that I bake it, not fry it with oil.  I feel like I taste the flavor of the eggplant more and without all the fat and calories of the oil.

eggplantlasagna08Make a slit down each Italian sausage and remove it from the casing.

eggplantlasagna09I then crumble it into a pan and brown it until cooked through.

eggplantlasagna10I used a whole bag of fresh spinach.  It looks like a lot, but it will wilt and shrink before your eyes.

eggplantlasagna11Here it is cooking in hot water……

eggplantlasagna12Here is the spinach after cooking.  It’s amazing how it cooks down like that.

eggplantlasagna13While you let your spinach cool enough to touch, boil up your lasagna noodles.

eggplantlasagna14This is really the amount of spinach that came out of that whole colander.  I don’t know why, but it surprises me every time!!  Still!

eggplantlasagna15Give it a good chop.

If you don’t want to go through the trouble of using fresh spinach, feel free to use a package of frozen spinach.  It works just as well.

eggplantlasagna16Add it to the ricotta, egg, and spices.

eggplantlasagna18Get it all mixed thoroughly.

eggplantlasagna17Here’s the lovely browned eggplant, out of the oven.

eggplantlasagna19Put down a layer of your favorite pasta sauce.

eggplantlasagna20Here’s my assembly line, all set up and ready to put together.

eggplantlasagna21I used the largest glass pan I own.  You can tell about 1/3 was eggplant and 2/3 was pasta.

eggplantlasagna22It’s easiest to spread the ricotta mixture first, then the sausage, then mozzarella and sauce on last.
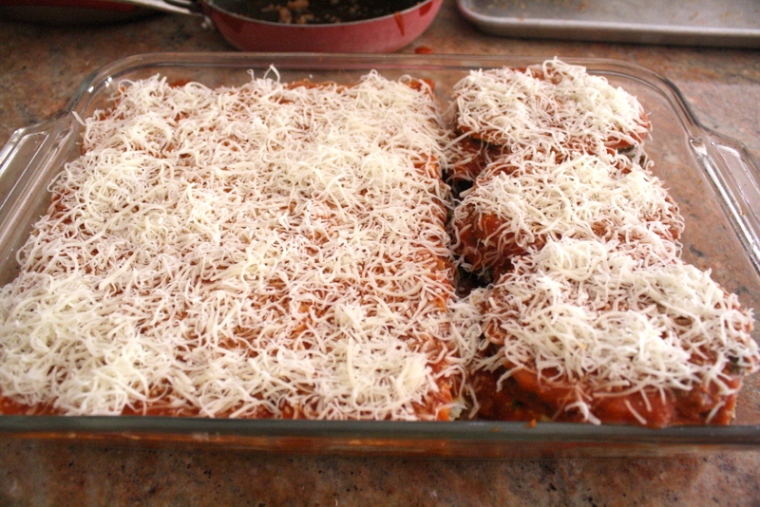
eggplantlasagna23Continue with the layers until you’re all done.  The top layer has more sauce and cheese.

eggplantlasagna24Bake it until your kitchen smells like your Italian grandmother’s house.  If you don’t have an Italian grandmother, just pretend.  That’s what I did!
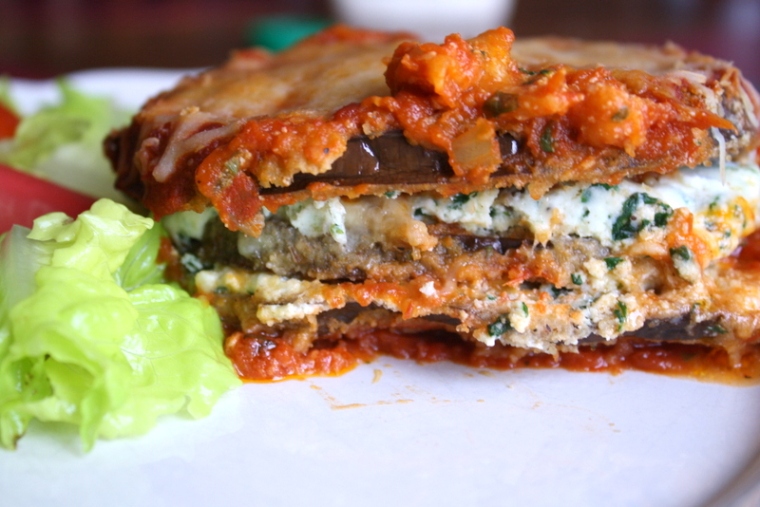
eggplantlasagna25Here’s a side shot of the eggplant……I mean aubergine parmigiana!! Delectable, I promise.

Warning: If you eat this right away, make sure you blow on it for a bit or you’re likely to burn the roof of your mouth.  I speak from personal experience.  But, it was kinda worth it!

2-in-1 Lasagna and Eggplant Parmigiana

1 medium size eggplant, ¼ inch slices

12 lasagna noodles, cooked al dente

3 cups Italian bread crumbs

4 eggs

2 tablespoons water

2 cups flour

5 links sweet Italian sausage, crumbled and cooked

1 bunch spinach, blanched chopped

16 oz ricotta cheese

½ cup parmesan cheese

Pinch nutmeg

2 cups mozzarella cheese

1 jar pasta sauce

½ tsp salt

¼ tsp pepper

After your eggplant is sliced, cover each piece first in flour, then 2 eggs that have been scrambled with water and lastly the bread crumbs.  Lay each slice of eggplant on a baking sheet and bake at 350 for 20 minutes or until golden brown.  Set aside.

For your lasagna filling, combine the ricotta cheese, the other 2 eggs, spinach, parmesan, nutmeg, salt and pepper.  Set aside.

To assemble this dish, use an 11×14 inch pan or your largest baking dish.  Start by pouring enough pasta sauce to cover the bottom of the dish.  Lay noodles down on one side and the baked eggplant on the other.  Spread on a layer of ricotta mixture, then sausage and mozzarella cheese.  Lightly spoon on and spread enough pasta sauce to cover each layer.  Continue each layer until you run out of ingredients.  For me this was 4 layers of pasta/eggplant and 3 layers of cheese/sausage.

The top layer is pasta and mozzarella cheese only.  Bake this at 350 degrees for 30 minutes, until cheese is bubbly and golden brown.
Baked Chicken Chimichanga

chimichanga11

The chimichanga by definition is a deep-fried burrito.  Since I’ve been trying to feed my family healthier foods, I’ve never dared tried making a chimichange myself.  But, when I came across this recipe for a baked chimi, I had to try it!  I completely did not miss the deep frying part.

chimichanga01

Start with mixing together cream cheese and taco seasoning.

chimichanga02

Stir in the Mexican four cheese blend.

chimichanga03

Here is my secret weapon for the quick weeknight meal………..store-bought rotissiere chicken!  Finally, the secret’s out!

Thank you to the genius who knows that moms can use some help every now and again and invented the precooked rotissiere chicken.

chimichanga04

Shred up the two breasts.

chimichanga05

Spread a generous layer of the cheese blend onto a flour tortilla.

chimichanga06

Layer on some chicken.

chimichanga07

Tuck and fold tightly so nothing leaks out.

chimichanga08

What a cute little bundle of joy…………I mean, deliciousness!

chimichanga09

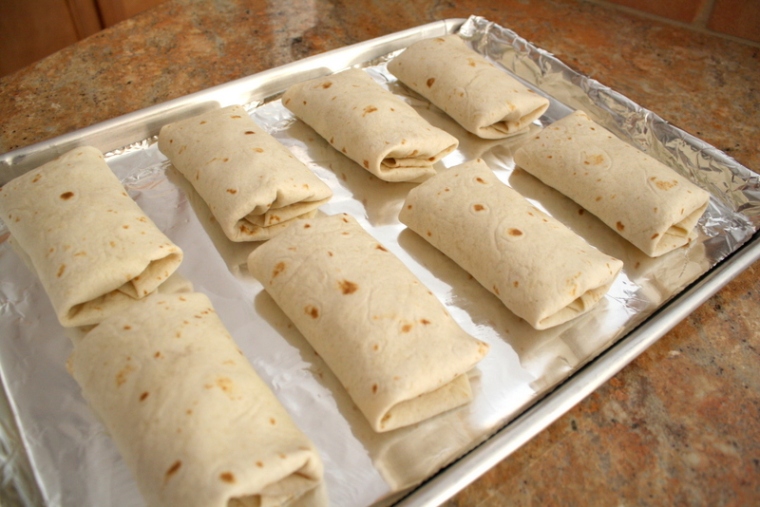
Lay the eight chimis seam side down on a baking dish.

chimichanga10

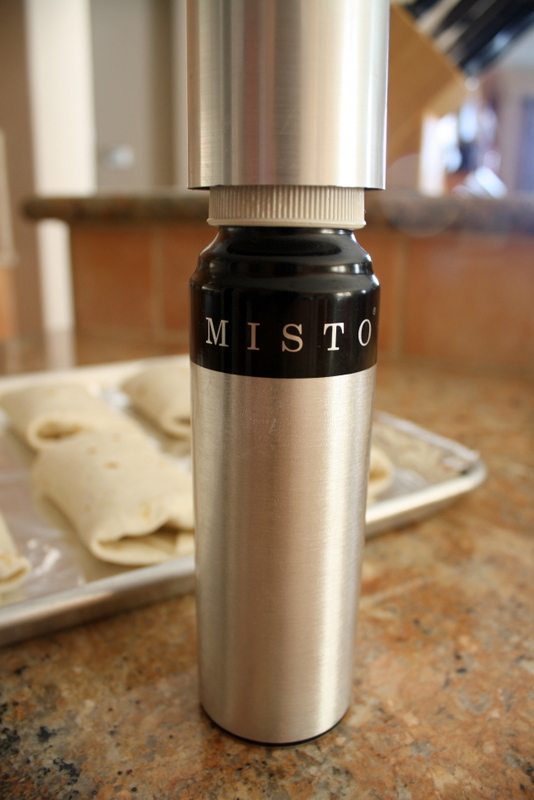
Then spray them with some vegetable oil spray.  I love my Misto, I can put any kind of oil in there and just pump and spray away!  It’s a very handy kitchen gadget and one of my favorites.

chimichanga12

I love that the chimichanga does get a nice brown crunchy texture on the outside.  Then when you bite into it, you get the creamy chicken with all that savory taco seasoning, delectable I tell ya’!!

I topped my chimi with sour cream, homemade salsa, shredded cheese and some green onions.  Here’s the recipe for the amazing restaurant style homemade salsa.

I know it’s good when my hubby keeps saying how good it is after each bite.  He did that about 4 times tonight.  This recipe is a keeper!

Baked Chicken Chimichanga

From Menu Managed

8 oz. package cream cheese
1 cup Mexican Blend cheese, shredded
1 taco seasoning packet
1 lb. store-bought  rotissiere chicken, shredded
8 flour tortillas
cooking spray
shredded cheese
green onions, for garnish
sour cream
salsa

Stir together cream cheese, Mexican blend cheese and taco seasoning.  Spread cheese mixture on a flour tortilla, then lay some shredded chicken on top.

Tuck in sides, and roll up each tortilla.  Lay seam side down on a baking pan lined with foil.
Spray tops of tortillas with cooking spray.
Bake at 350 degrees for 15 minutes.  Turn chimichangas over, and bake an additional 15 minutes.

Serve with cheddar cheese, green onions, sour cream, and salsa.

A Very German Dinner

Schnitzel, schnitzel, schnitzel, I love saying schnitzel…….with a German accent, of course.  What I made here is actually a schweine schnitzel, pronounced SH-VINE schnitzel.  This refers to a pork cutlet that is breaded and deep fried.  I opted for the healthier shallow pan fry with my schnitzel though.

Have a told you I like to say schnitzel?

This whole meal came together because I saw some really fresh brussel sprouts in the grocery store.  Brussel sprouts made me think of  my husband (who loves them), and he is German, so that made me think of schnitzel.  Of course, I had to add in the mashed potatoes because he loves that too.  That is the humble beginning of this Very German Dinner.

Start by laying out three shallow plates with the dredging ingredients.  This is about once cup of flour, seasoned with salt and pepper.

Here are two beaten eggs, also with salt and pepper.

Lastly, this is Panko bread crumbs.  You guessed it, season with salt and pepper.  You want each layer to be seasoned well.

I am forever indebted to the Japanese for creating the panko flake.  It’s the best way to get texture and crunch into anything that you want breaded.

Here is a lonely pork loin chop, sitting on a large sheet of parchment paper on my cutting board, minding its own business.  It has no idea what’s about to happen to it.  Poor thing.

Half the sheet is folded over so it can’t see what’s about to take place.  Get ready to take out your day’s frustrations on this pork chop.  The trick to pounding the chop into a cutlet is not just go crazy mad on the thing.  There is a method.  First of all, use the smooth side of your mallet, not the spikey side.

Start pounding with even force from the middle out.  As you pound down, finish with a sliding motion towards the outside of the chop. You are basically coaxing the chop into an even thinness.

This is what it should look like when you’re done.  The cutlet should be about double the size of the chop. This also tenderizes and reduces cooking time.  My favorite reason is because it maximizes the amount of flavor and crispy crust you get per bite.

When you are done pounding out the cutlet, set up your dredging station.  Start with flour on both sides.  Use just a thin coating and shake off the excess.

Then dip into the egg on both sides.

Last is the panko crumbs.  Sometimes, I find that I have to press the panko into the surface of the cutlet to get it to stay.

Gently lay it on a baking rack over a pan.

Oh, and did I mention, try not to bread your own fingers in the process?  I had a camera in my right hand the whole time, so I have an excuse.  Usually, you want to keep one hand wet and one hand dry so this breaded hand incident doesn’t happen.

Here are the beautiful cutlets, ready to get fried up in my pan to a golden brown.  The schnitzel turned out beautifully juicy on the inside and crispy crunchy on the outside.  Making sure that each dredging plate has salt and pepper is key to a flavor-filled pork cutlet.  Enjoy these with mashed potatoes and roasted brussel sprouts.

I will be posting the brussel sprouts recipe soon!

Panko Crusted Pork Cutlets

5 pork loin chops

1 cup flour

2 eggs, scrambled

2 cups panko bread crumbs

Salt and pepper

Canola oil

Prepare three separate plates and place the flour, eggs, and panko each in their own plate.  Season each plate with salt and pepper.  Place your pork chop on a parchment lined cutting board.  Fold over and pound the chop with a mallet until about twice the original size or ¼ inch thick.  Dip the pork on both sides into flour, eggs, and panko crumbs in that order.  Cover the bottom of a shallow frying pan with canola oil.  Fry each chop until golden brown on each side.  Enjoy while hot.

Green Sour Cream Chicken Enchiladas

These chicken enchiladas were a hit with my kids because they are simple, yet flavorful.  As most moms know, kids like simple flavors with not too much going on.  And as most moms know, we don’t like to spend a ton of time in the kitchen, so this recipe satisfies both kids and moms!

My favorite new tip is shredding chicken in your stand mixer.  It’s genius people, just genius I tell you!

Warm up some corn tortillas then slap on some canned refried beans and chicken on top.

Enchiladas are not enchiladas without cheese, so don’t be stingy with the cheese.  I used monterey jack here.  You can use anything you have on hand.

Place all the enchiladas, snuggly into a 9×13 pan and bake until bubbly and all the cheese is melted.  Serve to your family while hot and await the praise they will bestow upon you.

Green Sour Cream Chicken Enchiladas

15 corn tortillas

3 chicken breasts, cooked and shredded

1 can refried beans

¼ cup milk

1 (28 oz) green chile enchilada sauce

½ cup sour cream

1 pound shredded Monterey jack cheese

Stir to combine refried beans and milk in a microwave safe bowl.  Microwave for 3 minutes.  Prepare 9×13 pan by pouring some enchilada sauce, just to cover the bottom of the pan.  Take the remaining sauce and mix in the sour cream.  Warm the tortillas and spoon on beans, chicken then cheese.  Roll each enchilada and place seam side down in pan.  Pour sour cream enchilada sauce on top and sprinkle with cheese.

Bake at 350 degrees for 30 minutes or until bubbly and hot.

Chicken Picatta Pasta

It is HOT!  Southern California has been having a heat wave of triple digit temps all week.  And, the hotter it is, the less I want to use my oven, let alone be in the kitchen.  So, I found this refreshing pasta recipe that did not use the oven.

I did have to be in the kitchen though, but not for too long.

This is diced chicken breast, seasoned and browned nicely.

Pull it out when it’s done and set aside for now.

I’ve diced the aromatic shallots and garlic and gotten together the other ingredients for the dish.

Saute shallots and garlic in olive oil and butter.

After adding in the wine and reducing, add in some flour to make a thick sauce.  Thin out the sauce with chicken broth.

Stir in the capers.

Once all the flavors have had some time to marry, add the chicken back in and a squeeze of lemon.  Add in some penne pasta and you’ve got a simple and quick meal, made all in one pan.  You gotta love only having to clean up one pan, right?

Here’s is the very aromatic and savory chicken piccata pasta, garnished with some slices of green onion.  I love the creamy sauce with the hint of sour lemon juice and capers.  Refreshing for a hot summer night.  A tall glass of lemonade would complete the meal for me!

Chicken Picatta Pasta Toss

Adapted from Rachel Ray

2 tablespoons extra-virgin olive oil

1 1/2 pounds chicken breast , cut into 1-inch pieces

Salt and pepper

1 1/2 tablespoons butter

4 cloves garlic, chopped

1 shallot, chopped

2 tablespoons all-purpose flour

1/2 cup white wine

1 lemon, juiced

1 cup chicken broth or stock

2 tablespoons capers, drained

1 pound penne rigate pasta, cooked to al dente

Chopped scallions, for garnish

Heat a deep nonstick skillet over medium high heat. Add a tablespoon of extra-virgin olive oil and the chicken to the pan. Season chicken with salt and pepper. Brown chicken until lightly golden all over, about 5 to 6 minutes. Remove chicken from pan and return the skillet to the heat. Reduce heat to medium. Add another tablespoon extra-virgin olive oil and 1 tablespoon butter, the garlic and shallots to the skillet. Saute garlic and shallots 3 minutes. Add flour and cook 2 minutes. Whisk in wine and reduce liquid 1 minute. Whisk lemon juice and broth into sauce. Stir in capers. When the liquid comes to a bubble, add remaining 1/2 tablespoon butter to the sauce to give it a little shine. Add chicken back to the pan and heat through, 1 to 2 minutes. Toss hot pasta with chicken and sauce and serve. Adjust salt and pepper, to your taste. Top with fresh snipped scallions.

Cilantro Parsley Pesto Chicken

I know this bowl of green stuff looks very unassuming and maybe even a little scary.  Let me put you at ease by saying that this may be my favorite new condiment/sauce/dip/very yummy stuff!  It is really easy to make and packs a lot of flavor in one spoonful.  I’ve used it on chicken (as I’ll show below), mixed it into pasta and even spread it on a sandwich.  It just gives anything bland a punch of flavor.

This is not a traditional pesto as there is no basil or pine nuts, or any nuts at all.

The easiest part of this pesto is it’s all made in a blender, without cutting or chopping anything else.  First add in olive oil, lemon juice, garlic, salt and pepper.

Wash one bunch each of cilantro and flat leaf parsley.  I know this looks like a lot, but it all gets blended into only about one cup of pesto.

With your bare hands just rip off the tops, stems included.

Poor herbs, they had no idea was was comin’ to ’em!

Stuff the herbs down into the blender.  Now here’s the hard part, if you have a cheap blender like mine.  Once you start the blender it will blend the bottom half pretty easily, but the herbs toward the top would be blended.  Intermittently stop the blender and push all the leaves down toward the blades.  You can also drizzle more olive oil in slowly as the blender is running.

Here’s the lovely green concoction!

Taste and adjust seasoning with salt and pepper.

My favorite way to use the pesto is on chicken breasts.  I use chicken with bone and skin on.  Lift the skin and with your fingers and rub the pesto onto the meat, and then some more over the skin too.

Roast the chicken in the oven and savor the beautiful herbal flavors of cilantro and parsley in the juicy chicken dish.

Cilantro-Parsley Pesto Chicken

2 cups loosely packed fresh cilantro

2 cups loosely packed fresh flat-leaf parsley

2 large garlic clove, minced

3/4 teaspoon coarse salt

1/4 teaspoon freshly ground pepper

1/4 cup olive oil

6 chicken breasts, bone and skin on


Add in oil, garlic, herbs and seasoning to blender.  Pulse blender until blended well. With machine running, add in more oil in a slow, steady stream if needed.

Lift the skin of the chicken and with your fingers and rub the pesto onto the meat, and then some more over the skin too.

Bake at 425 degrees for about 45 minutes or until done.

Cauliflower Chowder

Cauliflower chowder is not one of the more popular chowders out there, but after making this recipe I hope it will be as popular in your home as it is in mine.  It is really easy to make and is mild flavored but full-bodied at the same time.  I love the creamy texture and it’s just so comforting to eat.

I know it’s almost  summer time, but fast forward 7 or 8 months and imagine a bowl of this hot chowder in your chilly hands as you sit on the couch, watching the rain fall on the windows.  Yeah, sounds good huh?!

Please don’t wait 8 months to make this though.  Make it today, it’s good anytime of year.

Start by sauteing diced onion, carrots and celery until soft.

Chop up one head of cauliflower.  You don’t need to be super precise, since it all breaks down and crumbles in the soup anyway.

Once tender, add in the chicken broth or vegetable broth if you want to stay vegetarian.


In a smaller pot, melt butter and add flour to make a roux.  Add in half and half once the flour is cooked a bit.

Pour the milky roux into the vegetables and it will thicken as it cooks.

Lower the heat to low and cover, stirring every 10 minutes.  The chowder is ready to eat now, but will only taste better as it sits longer.

To make this into a one pot meal, I like to add chunks of cooked chicken breast.  Better yet, buy one of those rotisserie chickens from the grocery store and just add the meat to this chowder.  Can’t get much easier than that!

The best thing about this soup is that I can actually get my daughter to have vegetables for dinner!!  She loves the flavor and texture and doesn’t even realize she’s eating 4 kinds of vegetables with each spoonful.  Gotta love it!

Cauliflower Chowder

1 stick Butter, Divided

1/2 Onion, Finely Diced

1 whole Carrot Finely Diced

1 stalk Celery, Finely Diced

1 large Cauliflower Head (roughly Chopped)

2 Tablespoons Dried Parsley

2 quarts Low-sodium Chicken Broth

6 Tablespoons Flour

1 cup Half-and-half

2 teaspoons To 4 Teaspoons Salt, To Taste

In a large soup pot or dutch oven, melt 4 tablespoons butter. Add the onion and cook for a few minutes, or until it starts to turn brown.

Add the carrots and celery and cook an additional couple of minutes. Add cauliflower and parsley and stir to combine.

Cover and cook over very low heat for 15 minutes. After 15 minutes, pour in chicken stock or broth. Bring to a boil, then reduce heat and allow to simmer.

In a medium saucepan, melt the other 4 tablespoons butter. Add the flour  and whisk to combine and cook the flour for one minute.  Add the half-and-half  to flour mixture and whisk until thickened. Add mixture to the simmering soup. Allow to simmer for 15 to 20 minutes. Check seasoning and add more salt or pepper if necessary.

Stuffed Beef Roll

My great friend, Valeria is an amazing cook!  She is also the queen of making up great recipes with what she has on hand in her fridge and pantry. This is one of her creations and I had to steal it for myself.

Unfortunately, my picture of this tasty stuffed beef roll does not do her recipe justice.  (sorry V!)

Just imagine a meatloaf with salty ham and creamy cheese oozing out of the middle.  Yup, I’m drooling too!!

Use three pounds of good ground beef.

Put all the beef ingredients into a large bowl and combine.

Once everything is combined, split the mixture in half.

Spread one half of the beef mixture onto a sheet of aluminum foil into a square.

Layer on the ham, leaving about 2 inches on the bottom and 3 inches on the top.

Place the slices of cheese on top.

The is the most fun part!  Start by folding up from the bottom.

Keep it rollin’!

Rollin’, rollin’, rollin’…………

Towards the end, fold down the top and smooth the seam out.

Make sure the ends are nicely sealed up too.

I don’t have pics of the rest of the cooking steps, but I have to imagine it’s because I had a hungry family in the background crying, “Mommy, stop taking pictures and let us eat it already!”  So, there you go.

Stuffed Beef Roll

Beef:

3 pounds ground beef

1 egg

½ cup Italian bread crumbs

¼ cup milk

½ tsp onion powder

½ tsp garlic powder

1 tsp dried basil

1 tsp dried parsley

1 tsp salt

½ tsp pepper


Stuffing:

8 slices black forest ham

6 slices cheese (muenster, provolone)

Fresh basil (optional)

Place all the beef ingredients into a bowl and combine well.  Divide in half and spread one half onto a large sheet of aluminum foil, into a 12 inch by 12 inch square.  Layer on the ham and cheese, leaving at least 3 inches at the top of the square.  Fold the bottom edge of the foil up and keep rolling to the top, then fold the top down to seal.  Use your fingers to smooth out the seam and ends.  Repeat the same thing with the second half of the ground beef mixture.

Lay both beef rolls on a sheet pan and bake at 350 degrees for about 45 minutes or until done.

Spinach Ricotta Stuffed Shells

These stuffed shells are a cinch to make and bake.  They are also a great make-ahead dinner item.  They can sit in the fridge during the day and just bake them right before dinner time and voila, dinner is ready!

My only problem is that my daughter doesn’t eat anything green.  So her plate ends up with all the cheesy stuffing and the shells are devoured quickly.  That’s why I always cook extra shells just for her.  Can someone please tell me when this perpetual-fear-of-vegetables stage will be over?

Combine the ricotta, spinach, basil, egg, nutmeg and salt and pepper and mix well.

The options are endless as to what you’d like to add to your stuffing…………fresh herbs, bacon, prosciutto, Italian sausage.  You can also substitute the spinach with artichokes or any other vegetable.

If you add a protein, this dish would hit all the food groups; meat group, dairy group, vegetable group, and pasta group.

Here’s the lovely mixture.  I really could just eat this with a spoon………..except for the raw egg part.

Use the jumbo shells.

I always cook extra shells,  for my picky daughter and also because some will break in the boiling process.

Once stuffed, cover with sauce and cheese and bake.  Simple and delicious!


Spinach Ricotta Stuffed Shells 

24 jumbo pasta shells

1 15-oz. container ricotta

2 cups shredded mozzarella

1 10-oz. package frozen chopped spinach, thawed and squeezed dry

10 leaves fresh basil, chopped

1 large egg, lightly beaten

Salt and pepper

Pinch of ground nutmeg

1 26-oz. jar spaghetti sauce


1. Preheat oven to 375ºF. Cook pasta shells according to package label directions; drain and set aside to cool. While pasta cooks, in a large bowl, stir together ricotta, spinach, basil, egg, salt, pepper, nutmeg.

2. Spread 3/4 cup spaghetti sauce over bottom of a 9×13 baking dish. Stuff shells with cheese mixture and place in dish. Spoon remaining sauce over shells and sprinkle with shredded mozzarella.

3. Cover baking dish with foil and bake for 35 minutes. Remove foil and bake about 10 minutes longer, until bubbly and cheese begins to brown.

Cranberry Chicken

I do realize that I’m using cranberries in a recipe and its not even Thanksgiving!  You do not need to wait for the holidays to make this chicken dish.  It’s great any time of the year.  The sweet and tangy sauce is so easy to make, it’s just 3 ingredients.  I promise.

I served it with steamed rice and roasted brussel sprouts.

Start with one can of whole cranberries.  Not the jelly stuff, you want the whole cranberries in it.

These are the other 2 ingredients.

Pour in half the bottle of French dressing and one packet of onion soup mix and combine.  Just look at those beautiful colors!

I like to use chicken thighs with the bone in.  I’m trying to be a little more health conscious lately, so I removed the skin.  You can keep it on if you you’re feeling frisky.

Pour the sauce all over the chicken, making sure you get the under side too. And bake.

What you’ll get is delectably tender chicken with a creamy sweet and savory sauce that you’ll want to drench your rice in.  Then you’ll want more rice for the sauce that’s left on your plate.  Then you’ll want more sauce for the extra rice that you got.  It’s a vicious cycle!  But so worth it.

Cranberry Chicken

1 can whole cranberries

½ bottle French dressing

1 packet onion soup mix

8-10 chicken thighs


Combine the first 3 ingredients in a medium bowl .  Place the chicken thighs in a 9×13 pan.  Pour the cranberry mixture evenly over the chicken.  Make sure to coat the bottom of the chicken as well.

Bake at 350 for 45 minutes or until done.

You will definitely want to serve this with rice to sop up all the great sauce.