Eggs in a Mug

Picture 081

I am so excited to share this new breakfast idea I recently discovered.  It has revolutionized my morning routine of feeding my kids a good hot breakfast before school.  Did you know you can make scrambled eggs in a mug?  In a microwave?  In  two and a half minutes?  I LOVE IT!

No more having to crack eggs in a separate bowl, then scramble them in a pan with oil and a spatula, then serve them on a separate plate!  The mug is the bowl, pan and plate all in one!!  Have I used enough exclamation points to let you know that I’m super excited about his one?!!!!!!  I think so.

Picture 060

Start by scrambling two eggs in a coffee mug, with some milk, salt and pepper.

Picture 064

Add in some shredded cheese.  Any kind you like.

Picture 066

Tear up some bread into small pieces.  I used 1/4 of a bagel here.

Picture 070

Then tear up some deli meat.  Yes, I used my bare hands.  I don’t have time for a cutting board and knife!  Stir everything up and pop it in the microwave.

Picture 076

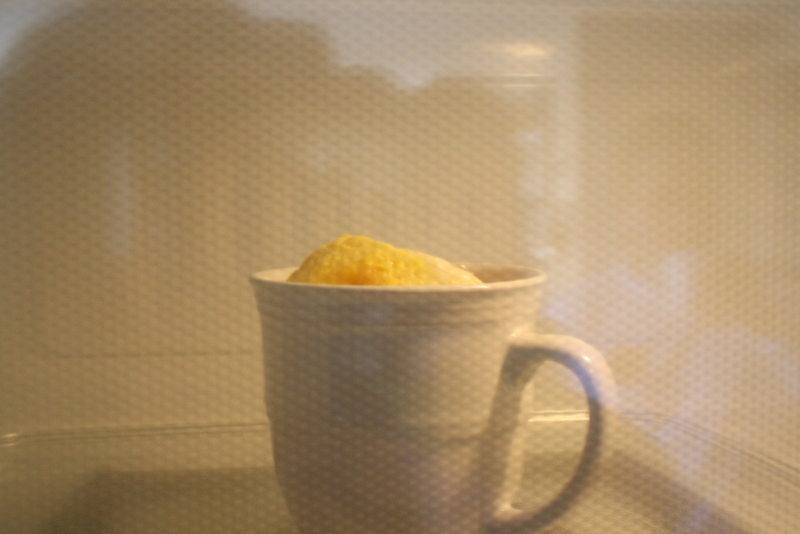
Look at that lovely goodness peeking out to say, “Hello, I’m ready to be your healthy and hot breakfast!”

Remember, you can change out the kinds of cheese, meat or bread you want.  Heck, you can even add in some veggies like spinach and tomatoes if you like.  Just think of what you like in your omelette and you can use it.

This is so easy, my kids can do it themselves.  That would really free up your morning routine!


Eggs in a Mug

2 eggs

4 tablespoons milk

2 tablespoons shredded cheese

Salt

Pepper

1 slice ham

½ slice of bread


Break the eggs into a mug and scramble with a fork.  Add in the milk, cheese, salt and pepper and beat it to incorporate.  Rip pieces of the ham and bread into the mug and combine with the fork.  Microwave on high for about 2 ½ to 3 minutes.

Chocolate Banana Bread

Everyone’s had the typical banana bread, right?  Well, take that and kick it up about 10 notches.  Oh and of course, add some chocolate to that.  It pretty much takes the typical and moves it into the extraordinary!

If you happen to have some browning bananas, I would highly suggest transforming them into this spectacular creation of a banana bread.  I would even go as far as to hide bananas from my kids, in the hopes that they get brown fast enough to make this again.

Cream the butter and sugar.

Use two brown bananas and mash them in a bowl.

Add the mashed bananas and sour cream.

Whisk together all the dry ingredients, then add it to the wet.

Add the mini chocolate chips and walnuts, for extra sweetness and crunch.

Pour the batter into a greased 9×5 inch loaf pan.

Look at this warm chocolate beauty!  I like how those mini chocolate chips are peeking out, enticing you to come and pluck them out one by one.

I guarantee that after this banana bread comes out of the oven, the 10 minutes you need to wait for this to cool will be the longest 10 minutes of your life!!  Even though banana bread is thought of as more of a breakfast food, my family ended up eating it for dessert.  Yup, it’s that good!

Chocolate Banana Bread Recipe

From Savory Sweet Life


1 stick of salted butter, softened to room temp.

1/2 cup sugar

1 egg

2 large ripened bananas mashed ( or 2.5 small bananas)

1 tsp. vanilla

1 cup flour

1 tsp. baking soda

2 Tbl. cocoa powder

1/2 cup of sour cream

1 cup of mini chocolate chips (regular chocolate chips work too)

optional 1/2 cup of chopped walnuts


Preheat over to 350 degrees.

Lightly grease a 9×5 loaf pan, or 2 mini pans with non-stick spray.

In a large bowl, cream butter and sugar together. Stir in egg, mashed bananas, sour cream, and vanilla until well blended.

Add baking soda, cocoa, and flour.

Mix everything until well incorporated (about 3 minutes in a stand mixer).

Add chocolate chips and nuts (if applicable).

Pour batter into loaf pan(s) and bake for 50 minutes – 1 hr.

Insert a tooth pick into the center of the loaf and check to see if it comes out clean when you pull it out.

Remove from heat and allow bread to rest in the loaf pan for 10 minutes.

Invert the loaf pans onto a cooling rack. Enjoy warm or cold.

Chunky Granola

My family has been granola crazy since I started making it myself.  They can’t get enough!  We find ourselves not only having it for breakfast on our yogurt with fresh berries, the kids are having it as an after school snack and my husband is eating it as a late night dessert.  I tell you it’s crazy the amounts of granola we are going through.

Here’s the main reason: I finally learned how to make it correctly!  Actually, I didn’t make it incorrectly before, it just wasn’t chunky like my family likes it.  My previous Maple Almond Granola recipe is still what I use now, but I learned how to chunk-i-fy it.

Here’s the secret ingredient for chunky granola!  Can you tell what it is?  C’mon, give it a guess………………..

It’s egg whites!  This is one egg white, for 3 cups of oats.

You beat it until it’s a little frothy and just add it to your favorite granola recipe.  Easy peasy!

Dump the beautiful mixture into a heap on a parchment-lined sheet pan.

Lay it out flat and do not touch it at all while it spends one and a half hours in the oven.

Here’s is what you’ll get.  Lovely sheets of yummy granola.  You can break it apart into bite-sized pieces and enjoy any way you like, for breakfast or dessert.

Maple Almond Granola

I have been buying 2 boxes of granola a week for my family and they go through it crazy fast.  After realizing how much money I was spending on it, I thought I should start making it myself.  Not only is this easier on the wallet, this tastes better than anything you can buy in your grocery store.

The best part about making homemade granola is that you can put anything you want into it.  You can use your favorite types of nuts or dried fruits.  Add or delete what you want to make the granola your own.

I started with old-fashioned rolled oats, sweetened coconut, sliced almonds, brown sugar and a few pinches of salt.  Combine it thoroughly and prepare the wet ingredients.

Here is the oil, maple syrup and honey all measured out.

Pour the syrup mixture into the dry mixture and toss to combine.

Spread it all out on a half sheet pan.

Here’s the granola after baking.  At this point, the warm granola is warm, crunchy and caramelized and is making my kitchen smell oh so good.

While the pan is still warm, I mixed in the raisins.  It took all my will power from eating all of this before my family had a chance at it.

Look at this up close and tell me you don’t want to run to your kitchen and make some right now!  The toasted oats, almonds and crispy coconut give your mouth a wonderful crunch.  The raisins are warm and plump and balance everything else.

Here’s how much one batch makes.  It fills up two 32 oz Ball jars.  It just so happened that a friend came over as I was filling these jars, so I gave him one.  I heard about it for the rest of the night from my hubby, “How could you give that away?!”  He only stopped when I promised to make him more tomorrow.  Funny hubby!


Homemade Granola

3 cups rolled oats

1 cup sliced almonds

1 cup shredded sweet coconut

½ cup toasted flax seed (optional, but so good!)

¾ teaspoon salt

¼ cup vegetable oil

¼ cup brown sugar

¼ cup maple syrup

2 tablespoons honey

1 cup raisins

1 egg white


Preheat oven to 250 degrees F.


In a bowl, combine the oats, nuts, flax seed, coconut, salt and brown sugar thoroughly.

In a measuring cup combine maple syrup, honey and oil.

Pour the wet mixture over the oats mixture and toss well to combine.

Beat one egg white  in a bowl until frothy and pour over the whole mixture and combine well.

Bake  for 1 hour and 30 minutes or until a golden brown color.

Remove from oven and break the granola into bite-sized pieces.

Add raisins and mix until evenly distributed.

Chocolate Chip Banana Nut Muffins

Before I begin, YES, I do realize this is only my first post of this month and it’s already December 21st.  Does that tell you a little about my busy life right now?

Amongst all the normal preparations for Christmas…………..I’ve hosted and attended several parties……………Helped  my son with his science fair project……………..Attended weekly Bible Study……………..Helped the kids study for Chinese school midterm exams……………….Crocheted like crazy for Christmas gifts……………….Baked for neighbors…………and tried to remember to breathe.  Okay, enough with the excuses.  Let’s get to these muffins!

Is it bad that I hope my bananas go brown and mushy before my kids can eat them, just so I have a reason to bake these?  Well, after tasting these muffins, I would buy perfectly good bananas and let them go brown, just for this recipe!

Talk about moist and fluffy.  This definitely makes getting up in the morning a little easier.  Knowing these muffins are waiting for me in the kitchen, puts a little pep in my step in the morning!

Start by mashing your ripe bananas with a fork.

Mix and whisk all the dry ingredients together.

I felt that my hand mixer was getting a little jealous of my stand mixer, so I brought it out to play today.

After adding the dry ingredients to the wet, slowly fold in the chocolate chips and walnuts.

Fill your paper liners 3/4 full and bake until your kitchen fills with the delectable smell of bananas and chocolate!

These muffins look even better sitting on this beautiful jade-green plate.  I got a set of these beautiful plates when my husband’s grandmother died this past summer.  They remind me of her and the colors of New Mexico, where she lived.

Thank you Grandma Katie, we love and miss you!

Moist Banana Chocolate Chip Muffins

Adapted from Curious Foodie


1 1/2 cups unbleached all purpose flour

1 1/2 tsp baking soda

1/4 tsp salt

1/8 tsp ground cinnamon

1 1/4 cups mashed ripe bananas (about 3 large)

3/4 cup sugar

1/2 cup (1 stick) unsalted butter, melted

1/4 cup milk

2 small eggs

1/2 tsp vanilla extract

1/2 cup chocolate chips

1/2 cup chopped walnuts


1. Preheat oven to 350°F. Grease 20 muffin cups or line with muffin papers.
2. Combine first 4 ingredients in a large bowl and whisk to combine.
3. Combine bananas, sugar, butter, milk, eggs and vanilla extract in a medium bowl with hand mixer
4. Mix in dry ingredients until just combined. Do not over-mix!
5. Fold in chocolate chips and walnuts.
6. Divide batter among prepared muffin cups, fill it till 3/4 full.
7. Bake until muffins are golden brown and tester inserted into center comes out clean, for about 20-25 minutes. (10 to 15 minutes for miniature muffins)
8. Cool muffins in tray for 5 minutes before transferring muffins to cooling rack to cool completely.

Bacon Egg and Biscuit Cups………The Breakfast of Champions

These bacon egg and biscuit cups are the ultimate in tasty and portable goodness.

Our family got together with 5 other families and went camping this past summer.  The fun thing about camping with friends is sharing the responsibility of making meals.  I signed up for breakfast and this is what I decided to make for everyone.   I figured it was a  good way for everyone to have a hot meal, without the mess of cooking eggs, bacon and biscuits at a campsite.  They reheated wonderfully wrapped in foil and popped on our portable bbq.


Don’t you just want to take a big bite out of this savory muffin?  I know you do……….

These are also wonderful to make for busy school mornings when you want the kids to have a nice hot breakfast, but don’t have the time for all the work and clean-up.

Here are the simple ingredients.

Start by greasing your cupcake pan.

Take each biscuit and flatten it out with your fingers.  Then cut each one into four even pieces.

My favorite way to cook bacon is to lay the pieces on some paper towels and pop them in the microwave, covered with some more paper towels to avoid splattering bacon grease.  Just cook until bacon is half cooked, but not crispy.

For toppings you can dice up some cooked ham.

And spinach.

Lay the pieces of biscuit in each cup and wrap the bacon around the top.

Par-bake the biscuit and bacon  for about 5 minutes, until the biscuit rises a little.

Pour in the scrambled eggs and other toppings.  Make sure to not fill too full because……….

………this could happen!

This was my first batch.  Luckily I thought ahead and placed the pan on a cookie sheet to catch the drips.  I also added some shredded cheese on top.

Regardless of the look, they still tasted amazing!

Here’s the lovely inside of the biscuit cup.  You will love the moist bread and egg, contrasted with the crunchy bacon all in one big bite.  These will be a hit with the family.  The best thing is you can make a bunch and leave them in the fridge to be reheated for breakfast all week.  I haven’t tried freezing them, but if you do and they work, let me know okay?

Bacon Egg and Biscuit Cups

15 eggs, scrambled

salt and pepper

½ pack of ham, diced

one pack chopped spinach, defrosted

biscuit dough

30 slices bacon

shredded cheddar cheese


Scramble the eggs in a large measuring cup with a spout.  Add salt and pepper.  Flatten out each piece of  biscuit dough with your fingers and cut into four pieces.  Place the pieces into greased cupcake pan.  Par-cook the bacon in the microwave then wrap the bacon around the top of the biscuit dough.

Bake at 350 degrees for 5 minutes.  Remove the pan from the oven and pour in the scrambled egg mixture into each cup, only about 2/3 full.  Put on the toppings of ham, spinach, cheese or anything else you like.

Put the pan back into the oven for 10-15 minutes or until eggs are cooked.  Remove each biscuit cup and enjoy warm.

Makes  30 biscuit cups.

Berry Oat Bread

This might be the world’s easiest sweet bread to make.  I only used 5 kitchen tools…….a large bowl, a glass measuring cup, measuring spoons, a spatula, and a loaf pan.  Now, that’s my kind of clean-up!  Am I right?!

Also, the main reason I made this bread is because I had all these ingredients in my pantry and fridge.

Well………technically, I didn’t have buttermilk on hand.  That is easily remedied by my homemade version, using regular milk and vinegar.  Just substitute one cup of buttermilk with one tablespoon of vinegar plus enough milk to make one cup.

I had reservations about the oats drying out the bread, but to my surprise it was totally moist.  The berries also help with the moisture content.  They also add sweetness and tang.  Love that combination!

Berry Oat Bread

Adapted from youmadethat.com

2 cups all purpose flour

1 cup quick cooking oat

1 cup sugar

1 1/2 tsp. of baking powder

1/2 tsp. baking soda

1/4 tsp. salt

1/8 tsp. cinnamon

1/8 tsp. nutmeg

3/4 cup of buttermilk

1/2 cup canola oil

1 tbsp. lemon zest

2 eggs

1 cup blueberries

1/2 cup diced strawberries

Combine all dry ingredients and lemon zest in large mixing bowl and mix together with a spatula.

In a small bowl whisk eggs, buttermilk and oil together.

Pour egg mixture into the dry ingredients and mix.

Fold in berries and pour into a greased and floured loaf pan.

Bake at 325 degrees for about 1 1/2 hours, checking for doneness about 10  min. before timer goes off with a cake tester.  If you are using fresh berries and not frozen then only cook for about 65 min.

Berry Buttermilk Muffins

These berry muffins came out beautifully and I couldn’t ask for a better way to use up the left over berries from my fruit tart.  They were very tender and moist.  The crunch from the turbinado sugar also adds a wonderful texture contrast to this  billowy soft muffin.

The next time you find yourself with extra berries around the house, try this recipe.  You’ll love them for breakfast in the morning!


Buttermilk Berry Muffins

adapted from the Joyofcooking.com


2 1/2 cups all-purpose flour

3/4 cup granulated white sugar

2 teaspoons baking powder

1/2 teaspoon baking soda

1/4 teaspoon salt

Zest of one orange

1 large egg, lightly beaten

3/4 cup buttermilk

2/3 cup safflower or canola oil

1 teaspoon pure vanilla extract

2 cups fresh raspberries and blackberries

1/4 cup turbinado raw cane sugar


Preheat oven to 375 degrees F. Position rack in center of oven. Butter or spray with a non stick cooking spray 12 – 2 3/4 x 1 1/2 inch muffin cups or use paper liner. Set aside.

In a large measuring cup or bowl whisk together the egg, buttermilk, oil, and vanilla extract.

In another large bowl combine the flour, sugar, baking powder, baking soda, salt, and orange zest. Gently fold in the berries. With a rubber spatula fold the wet ingredients into the dry ingredients and stir only until the ingredients are combined. Do not over mix the batter or tough muffins will result.

Fill each muffin cup almost full of batter, using two spoons or an ice cream scoop.  Generously sprinkle raw sugar over the top of each muffin.

Place in the oven and bake until a toothpick inserted in the center of a muffin comes out clean, about 20 minutes. Transfer to a wire rack and let cool for about 5 minutes before removing from pan.

Makes 12-15 regular sized muffins or 6 jumbo muffins.

Note: If using frozen berries you may have to bake the muffins a little longer than the stated time. Also, if making jumbo sized muffins, again, you may have to bake the muffins a little longer.

A Valentine’s Day Breakfast

Guest Chef:  My hubby.

This is what my sweetheart made for me this morning, on Valentine’s Day

These waffles look very romantic to me.  I think it’s the color of the berries on top, the powdered sugar, and of course the the fact that my hubby made them for me!  I know it sounds as if I’m painting a very romantic picture of a Valentine’s breakfast with the just the two of us at the table with candlelight and music…………………so NOT true!

The kids are at the table in their pajamas and we happen to have company visiting too (sister and brother-in-law, Anne and Aaron).  It was a busy morning in the kitchen with kids running around, the waffle iron with drips of batter all over the counter and trying to get it all on the table while it’s still morning!

Nevertheless, I took a moment to enjoy the fact that my hubby made these waffles for me, on Valentine’s Day.

I hope you are able to spend today with a loved one!  And if not, make these waffles.  I know it’ll make you feel warm and lovely on the inside.


Waffles

From Better Homes and Gardens

1-3/4  cups  all-purpose flour

2  tablespoons  sugar

1  tablespoon  baking powder

1/4  teaspoon  salt

2    eggs

1-3/4  cups  milk

1/2  cup  cooking oil or butter, melted

1  teaspoon  vanilla

1. In a medium bowl stir together flour, sugar, baking powder, and salt. Make a well in center of flour mixture; set aside.

2. In another medium bowl beat eggs slightly; stir in milk, oil, and vanilla. Add egg mixture all at once to flour mixture. Stir just until moistened (batter should be slightly lumpy).

3. Pour 1 to 1 1/4 cups batter onto grids of a preheated, lightly greased waffle baker (use a regular or Belgian waffle baker). Close lid quickly; do not open until done. Bake according to manufacturer’s directions. When done, use a fork to lift waffle off grid. Repeat with remaining batter. Serve warm.

4. Makes 12 to 16 (4-inch) waffles

5. Buttermilk Waffles:Prepare as above, except reduce baking powder to 1 teaspoon and add 1/2 teaspoon baking soda. Substitute 2 cups buttermilk or sour milk for the milk.

Blueberry Scone with Lemon Glaze

When you think of scones, do you think of hockey puck-like pastries that stuffy English people eat with afternoon tea? So did I.  I remember having them at a bridal shower tea and I had to slather so much of that clotted cream and curd on it just to make it go down my throat.

Well, these are not your English grandmother’s scones (if you have an English grandmother that is).  They are solid on the outside, put totally flaky and light on the inside.

My kids liked these so much they asked for them as dessert after dinner.  I figure, why not?!  We’re not English and we don’t drink tea in the afternoon either.

I’m not sure what the etiquette is on eating a scone for dessert, but until I hear otherwise, we’ll keep doing it!!


Get the dry ingredients and the really cold butter mixed in together.


Here’s the butter incorporated evenly.

The original recipe calls for fresh blueberries, but I would recommend using frozen ones.  They make the mixing and rolling process so much easier.


The blue color also won’t spread all through the dough (as much) and discolor it and your hands and kitchen counter and clothes.  Can you tell I had some issues?!

Cut them into good size triangles.


Place them on a baking sheet.  I did not grease mine because this has enough butter in it……..believe me!


Take them out and let them cool completely.

Meanwhile, make your glaze.


Zest two lemons.  I used a regular lemon (left) and a meyer lemon (right).  It’s what I had on hand.  You can just use two regular ones.


The ingredient that really makes this scone transcend your usual scone is the lemon in the glaze.  It’s like the feeling you get when pop rocks go off in your mouth.  You don’t expect to get these hits of sweet and sour tang……..it’s delectable!


Lay the scones on a rack in your baking sheet and glaze away.  Let the glaze dry completely and you are on your way to making best friends out of your neighbors……..if you choose to share!


Blueberry Scones with Lemon Glaze

from Tyler Florence


Scones:

2 cups all-purpose flour

1 tablespoon baking powder

1/2 teaspoon salt

2 tablespoons sugar

5 tablespoons unsalted butter, cold, cut in chunks

1 cup heavy cream, plus more for brushing the scones

1 cup frozen blueberries


Lemon Glaze:

1/2 cup freshly squeezed lemon juice

2 cups confectioners’ sugar, sifted

1 lemon, zest finely grated

1 tablespoon unsalted butter

Preheat the oven to 400 degrees F.


Sift together the dry ingredients; the flour, baking powder, salt, and sugar. Using 2 forks or a pastry blender, cut in the butter to coat the pieces with the flour. The mixture should look like coarse crumbs. Make a well in the center and pour in the heavy cream. Fold everything together just to incorporate; do not overwork the dough. Fold the blueberries into the batter. Take care not to mash or bruise the blueberries because their strong color will bleed into the dough.

Press the dough out on a lightly floured surface into a rectangle about 12 by 3 by 1 1/4 inches. Cut the rectangle in 1/2 then cut the pieces in 1/2 again, giving you 4 (3-inch) squares. Cut the squares in 1/2 on a diagonal to give you the classic triangle shape. Place the scones on an ungreased cookie sheet and brush the tops with a little heavy cream. Bake for 15 to 20 minutes until beautiful and brown. Let the scones cool a bit before you apply the glaze.

Technically you should make this simple lemon glaze in a double boiler (i.e. over a pot of simmering water with a heatproof bowl set on top) but it’s even simpler to zap it in the microwave. Mix the lemon juice and confectioners’ sugar together in a microwave-safe bowl. Stir until the sugar dissolves. Add the lemon zest and butter. Nuke it for 30 seconds on high. Whisk the glaze to smooth out any lumps, then drizzle the glaze over the top of the scones. Let it set a minute before serving.